


How to Sew the Simplest Pencil Pouch (Easy Zipper Pouch Tutorial for Beginners)
By a Bug & a Bean | Posted on 2026-01-09Learn how to sew the simplest pencil pouch with an expandable design, zipper, and bias binding. Beginner-friendly step-by-step tutorial with optional keychain loop.
Post TagsSEWING PROJECTS SEWING FOR TEENS
This post may contain affiliate links. If you make a purchase through one of our affiliate links, we may receive a small commission at no additional cost to you.
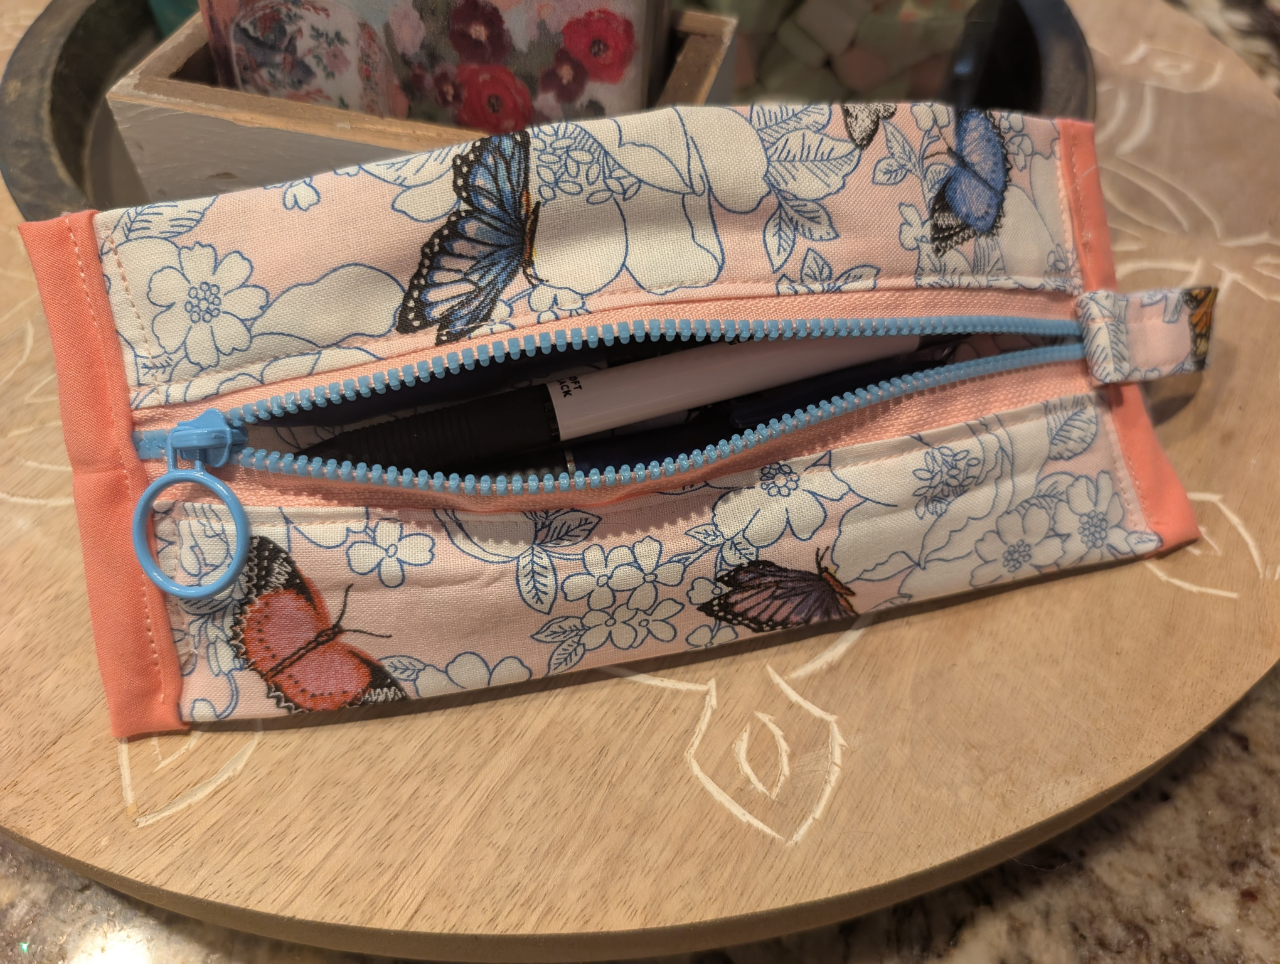
Table of Contents
- Supplies & Materials
- Helpful Tools
- Step-by-Step: How to Sew the Simplest Pencil Pouch
- Optional: Add a Keychain Loop
- Finish the Raw Edges with Bias Binding
- How the Expandable Pencil Pouch Works
- Video Tutorial
- Customization Ideas
- More Beginner Sewing Projects
Don't Forget to Pin This!
Don't lose this idea. Save it for later or share the magic with a friend. Pin it to your favorite Pinterest board!
This is the simplest pencil pouch you can sew! It still has that “wow” factor thanks to the expandable sides! It’s perfect for school supplies, art markers, journaling pens, or even small travel items. The construction is beginner-friendly, uses straight seams, and finishes neatly with bias binding (plus an optional keychain loop if you want to clip it to a backpack).
Why You’ll Love This Simple Expandable Pencil Pouch
- Beginner-friendly zipper installation (no tricky curves)
- Expandable sides that “pop” open like a popcorn bag
- Neat, durable finish using bias binding
- Customizable fabrics for kids, teens, or adults
- Optional keychain loop for backpacks, binders, or hooks
Supplies & Materials
- 2 pieces cotton fabric cut to 12 x 8 inches
- 2 pieces double fold bias binding, at least 5 inches long Make your own with our quick and easy tutorial.
- 1 long zipper, at least 8 inches long
- Optional: matching scrap cotton, 2 inches wide (for keychain loop)
Helpful Tools
New to sewing? Make sure you have the basics. Check out our Sewing Essentials Guide for Beginners to make sure you have everything you need to start sewing.
- Sewing machine
- Zipper foot
- Clips or pins
- Iron and ironing board
- Ruler or measuring tape
- Fabric scissors or rotary cutter
Beginner Sewing Machines

Brother Sewing Machine Lightweight
This is a basic beginner sewing machine. It comes with all the essential stiches you need and is a good quality machine for the price.

Singer Patchwork Plus
This is the machine I use most often and you will see in many of my videos. It is a great price with great functionality!

Singer Quantum Stylist
This is a great hobby sewing machine that will last and save you frustration of lower end models. It even comes with an extension table for quilting.
Step-by-Step: How to Sew the Simplest Pencil Pouch
-
Sew the first side of the zipper.
With right sides together, place the top of the zipper in between the two cotton fabrics along one 8-inch side. Align the top edges of all three layers (cotton, zipper, cotton), clip in place, and sew across. -
Press and topstitch near the zipper.
Unfold the fabrics so the right sides are facing up. Iron the fabric away from the zipper, then sew across the fold close to the zipper using a zipper foot. -
Sew the second side of the zipper.
Grab the opposite 8-inch edges of the cotton fabrics. Pull one cotton piece up on each side so the cotton fabrics are right sides together and aligned with the other side of the zipper. Clip and sew across. -
Press and topstitch the second side.
Pull the fabrics through the open edges so right sides are up again. Iron the fabric away from the zipper and topstitch across the fold close to the zipper using a zipper foot. -
Center the zipper and create the expandable folds.
Align the zipper in the center. Using a ruler, measure and push each outer fold inward by 1 inch on each side. This creates an expandable flap on each side (similar to a popcorn bag). Clip the folds together. -
Secure the folds at the top and bottom.
Sew across each top and bottom edge to hold the folds in place. These seams keep the expandable sides neat and stable.
Optional: Add a Keychain Loop
If you’d like to add a keychain loop, use matching scrap cotton that is at least 2 inches wide. If your scrap is wider, trim it down to 2 inches first.
- Fold the strip in half lengthwise and iron.
- Open it up, then fold each long edge inward toward the center crease (almost to the center line) and iron.
- Fold it again along the original center line and iron so all raw edges are tucked inside.
- Sew a line down each long side to create a finished loop.
Finish the Raw Edges with Bias Binding
-
Attach bias binding to one raw edge.
Open your bias binding. Align the top edge of the bias tape with the top edge of your raw fabric edge. The bias binding should hang over slightly on both sides. Pin or clip in place and sew across.
Note: If you’re adding a keychain loop, place the top edge of the loop centered between the fabric and the binding before sewing. -
Wrap, fold, and stitch the binding closed.
Fold the bias binding up and over the raw edge. Fold in the extra binding that hangs over on each side for a clean finish.
If using a keychain loop, wrap it up and over the edge, then fold the other end of the loop so it’s centered between the fabric and binding. Sew across to secure everything. -
Repeat on the other raw edge.
Repeat the same two steps to bind the remaining raw edge. This gives your pencil pouch a tidy, durable finish.
How the Expandable Pencil Pouch Works
Once the bias binding is sewn on both ends, your pencil pouch is complete! The best part is the expandable sides. When the pouch is empty it stays slim, but as you fill it with pens and pencils, the sides pop open and expand to hold more.
Video Tutorial
Watch us make this project on TikTok. Follow us @abugandabean for more sewing and creative tutorial videos.
@abugandabean POV: you finally sew a zipper pouch that actually EXPANDS 😍✏️ Ok, so I'm just burning through this Walmart butterfly fabric this week! This was actually one of my favorite beginner projects when I first started trying to get the hang of zippers. I haven't made one of these in forever so it was fun making another one. Measurements in comments and on abugandabean.com This is the simplest pencil pouch ever. perfect for school, journaling pens, or craft supplies. Beginner-friendly, straight seams. Save this tutorial & sew one with me in just a few minutes. (Warning: you’ll want to make more than one!) #SewWithMe#BeginnerSewing#EasySewing#ZipperPouch #quicksew #abugandabean #sewingtiktok #SewingTutorial#DIYProjects#CraftTok#SewingTok#Handmade#SewingProjects #sewingmywayto10k #fyp #craftymoms #learntosew #sewingideas #sewinginspo #sewingforbeginners #sewingforyoupage #sewinghowto #sewingblog ♬ Little Things - Tiqta
Customization Ideas
- Use fun novelty cotton for kids or back-to-school prints
- Try contrasting bias binding for a bold pop of color
- Add a name tag label for personalized gifts
- Make matching sets for teachers, students, or party favors
More Beginner Sewing Projects
If you enjoyed this easy zipper pencil pouch, you’ll love our other beginner-friendly sewing projects that use simple supplies and quick techniques. Save your next sewing project idea!
Join the Crafty Creator Club ✨
Get exclusive access to free printables, special discounts, custom template access codes, and creative inspiration.
Join the Magic